Vinyl plank flooring has become increasingly popular due to its durability, affordability, and ease of installation. However, even the most carefully installed vinyl flooring can develop issues over time, with unevenness being a common problem. In this guide, we’ll walk you through the process of fixing uneven vinyl plank flooring, providing you with the knowledge and confidence to tackle this home improvement project.
Table of Contents
Understanding the Causes of Uneven Vinyl Flooring
Before diving into the repair process, it’s essential to understand what causes vinyl plank flooring to become uneven. Some common reasons include:
- Subfloor irregularities
- Improper installation
- Temperature and humidity fluctuations
- Wear and tear over time
- Heavy furniture or appliances
Identifying the root cause will help you determine the best approach for fixing the issue and preventing future problems.
Tools and Materials Needed
To successfully level your vinyl plank flooring, you’ll need the following tools and materials:
- Pry bar
- Utility knife
- Hammer
- Tapping block
- Pull bar
- Spacers
- Level
- Measuring tape
- Pencil
- Safety glasses
- Knee pads
- Floor leveling compound (if necessary)
- Replacement vinyl planks (if needed)
- Adhesive (for glue-down installations)
Step-by-Step Guide to Fixing Uneven Vinyl Plank Flooring
Step 1: Assess the Situation
Begin by carefully examining the affected area to determine the extent of the unevenness and identify any visible causes.
Step 2: Remove Baseboards and Trim
Carefully remove any baseboards or trim around the perimeter of the room using a pry bar. This will give you access to the edges of the flooring.
Step 3: Identify the Problem Area
Use a level to pinpoint the exact location and severity of the unevenness. Mark the problem areas with a pencil for easy reference.
Step 4: Remove Affected Planks
For click-lock vinyl planks:
- Start at the edge of the room and work your way towards the uneven area.
- Use a tapping block and hammer to gently separate the planks.
- Lift and remove the planks, being careful not to damage surrounding pieces.
For glue-down vinyl planks:
- Use a utility knife to score along the edges of the affected planks.
- Carefully pry up the planks using a putty knife or pry bar.
- Remove any remaining adhesive from the subfloor.
Step 5: Address Subfloor Issues
If the unevenness is due to subfloor irregularities:
- Use a floor leveling compound to smooth out any dips or bumps in the subfloor.
- Follow the manufacturer’s instructions for mixing and applying the compound.
- Allow the compound to dry completely before proceeding.
Step 6: Reinstall or Replace Planks
For click-lock vinyl planks:
- Clean the exposed subfloor and ensure it’s dry.
- Begin reinstalling the planks, starting from the edge of the room.
- Use a tapping block and hammer to secure each plank in place.
- Replace any damaged planks with new ones as needed.
For glue-down vinyl planks:
- Apply a thin layer of adhesive to the subfloor using a notched trowel.
- Carefully place the planks back into position, ensuring proper alignment.
- Use a roller to press the planks firmly into the adhesive.
- Replace any damaged planks with new ones as needed.
Step 7: Allow for Proper Curing
Give the flooring time to settle and the adhesive (if used) to cure completely. This typically takes 24-48 hours.
Step 8: Reinstall Baseboards and Trim
Once the flooring has settled, reinstall the baseboards and trim to complete the repair.
Troubleshooting Common Issues
| Issue | Possible Cause | Solution |
|---|---|---|
| Planks won’t click together | Debris in the locking mechanism | Clean the locking system thoroughly |
| Gaps between planks | Improper installation or temperature changes | Use a tapping block to close gaps or adjust expansion space |
| Bubbles or lifting | Moisture or adhesive issues | Address moisture problems and reapply adhesive if necessary |
| Persistent unevenness | Subfloor irregularities | Use a floor leveling compound to smooth the subfloor |
| Damaged planks | Wear and tear or improper handling | Replace damaged planks with new ones |
Preventive Measures for Maintaining Even Vinyl Flooring
To keep your vinyl plank flooring even and in good condition:
- Maintain consistent indoor temperature and humidity levels.
- Use furniture pads to distribute weight evenly.
- Clean the floor regularly to prevent debris buildup.
- Address spills and moisture immediately.
- Avoid dragging heavy objects across the floor.
Comparison of Flooring Adjustment Methods
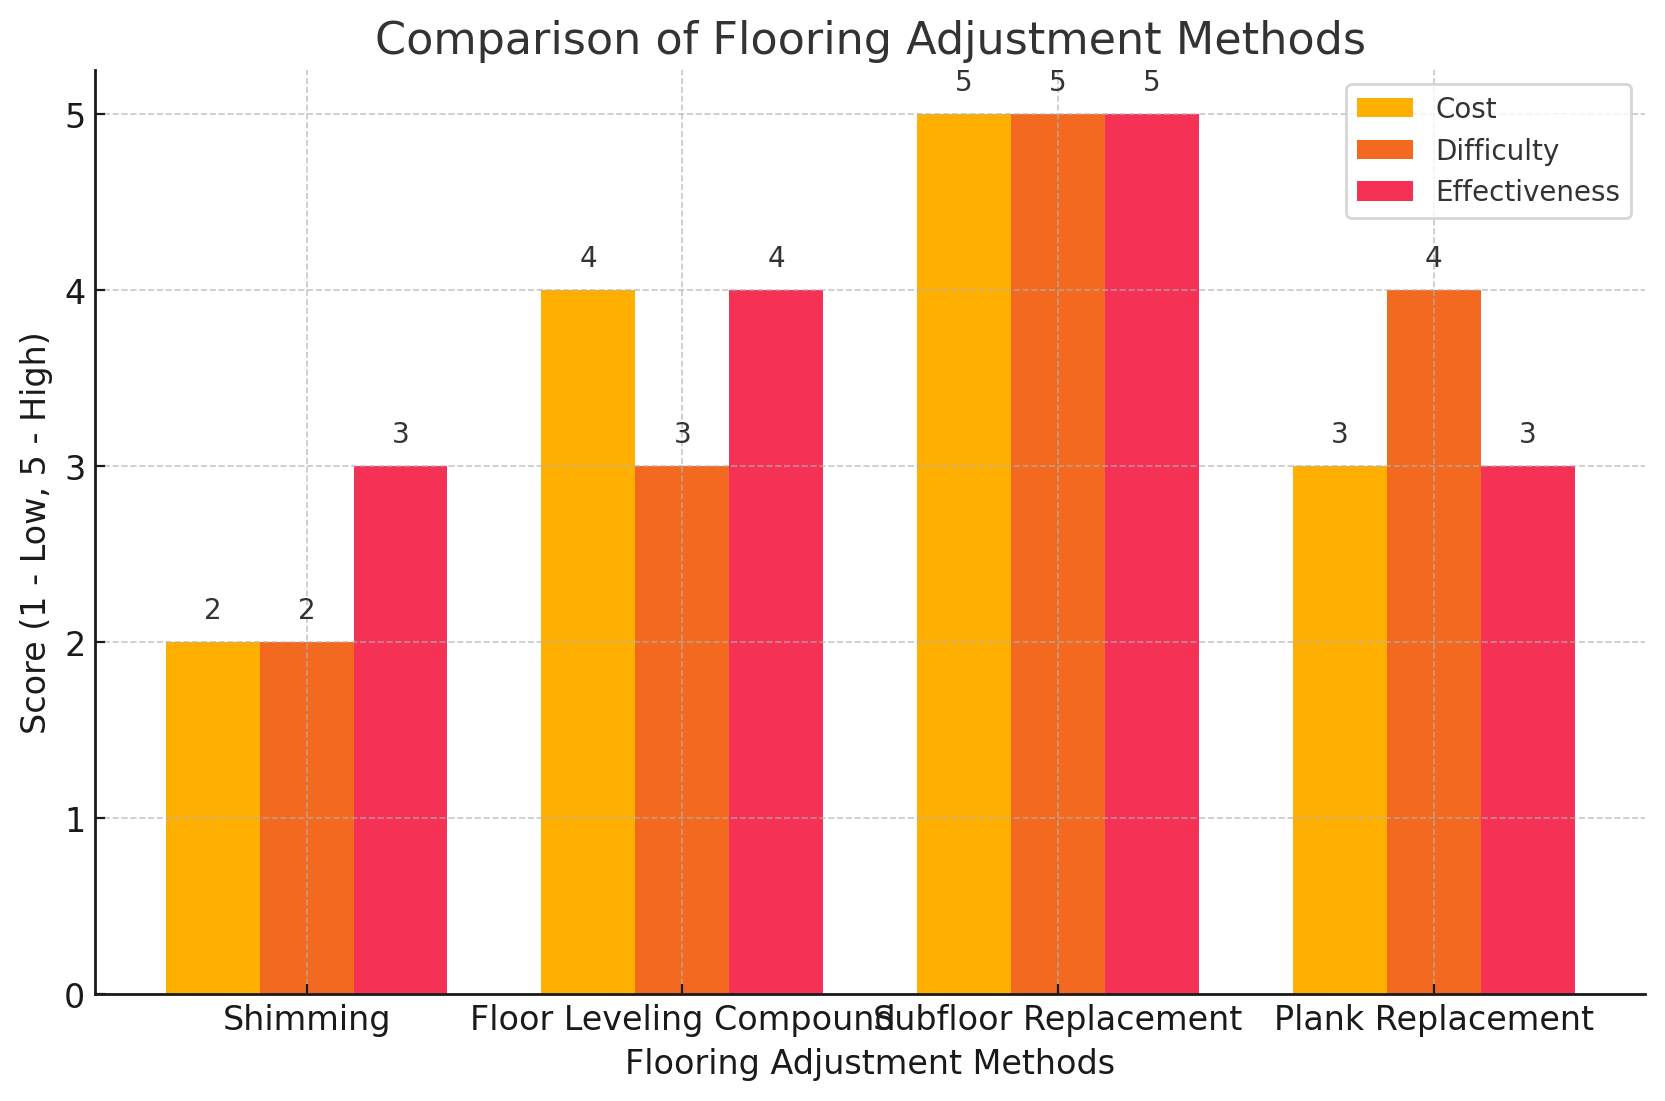
Here’s a graph comparing common flooring adjustment methods in terms of cost, difficulty, and effectiveness:

This graph provides a visual comparison of flooring adjustment methods, including shimming, floor leveling compound, subfloor replacement, and plank replacement, rated on a scale from 1 (low) to 5 (high) across cost, difficulty, and effectiveness.
Personal Experiences and Tips
As someone who has tackled uneven vinyl plank flooring in my own home, I can attest to the importance of proper preparation and patience. Here are some personal tips:
- Take your time during the assessment phase to accurately identify all problem areas.
- Invest in quality tools, especially a good level and tapping block.
- Don’t hesitate to ask for help, especially when removing and reinstalling large sections of flooring.
- Always order extra planks when initially installing your floor to have matching replacements on hand.
Conclusion
Fixing uneven vinyl plank flooring may seem daunting, but with the right tools, knowledge, and approach, it’s a manageable DIY project. By following this comprehensive guide, you can restore the beauty and functionality of your vinyl flooring, ensuring a smooth and even surface for years to come.
Remember to address any underlying issues, such as subfloor problems or moisture concerns, to prevent future unevenness. With proper maintenance and care, your newly leveled vinyl plank flooring will continue to enhance your home’s aesthetic and value.
FAQ
1. Why does my vinyl plank flooring become uneven over time?
Vinyl plank flooring can become uneven due to subfloor issues, temperature fluctuations, improper installation, or heavy furniture. Addressing these factors during installation and regular maintenance can prevent unevenness.
2. Can I fix uneven vinyl plank flooring myself, or do I need a professional?
You can fix uneven vinyl plank flooring yourself if you’re comfortable with DIY projects and have the necessary tools. However, for extensive issues, it might be beneficial to consult a professional to ensure the problem is fully resolved.
3. What is the best way to prevent my vinyl plank flooring from becoming uneven?
To maintain even flooring, keep a consistent temperature and humidity level indoors, use furniture pads, avoid dragging heavy objects, and address spills promptly. Properly preparing the subfloor during installation is also crucial.

Chirag Sachdeva is a seasoned digital marketing expert with over 15 years of experience spanning digital strategy, content management, and SEO. Chirag is the founder of Digifly Technology, where he empowers businesses to grow through innovative digital solutions. With a deep understanding of content strategy and market trends.


